Modern C++ Development On Stm32: A Blinky Example With Cmake
A guide to setting up STM32 development using C++, CMake, and VS Code
Introduction
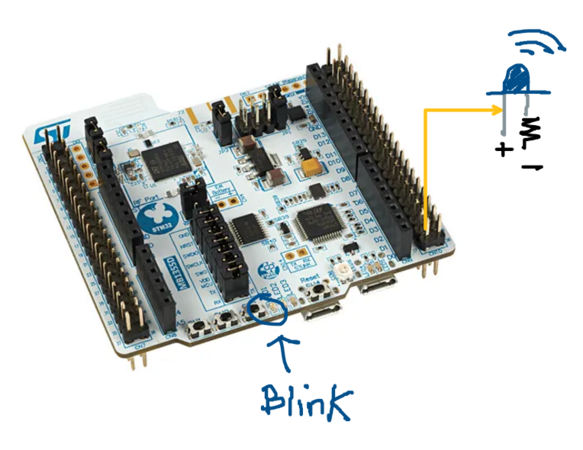
In this tutorial, I’ll walk you through setting up the STMicroelectronics STM32WB55RG development board for C++ development using a CMake build system and VSCode as the IDE of choice. We’ll create a simple Blinky example (the embedded system’s classic 🗣️“Hello World”) that toggles the blue LED on the Nucleo-WB55RG board.
While ST provides the STM32CubeIDE application for development, I prefer using VSCode.
Setting this up took some effort, so I’m documenting the process for others looking to build a modern C++ embedded development workflow.
Board Overview: STM32WB55RG Key Features 🗝️
The STM32WB55RG is a powerful and versatile board featuring:
- Dual core Arm Cortex M4 processor with FPU (Floating Point Unit)
- Built in Bluetooth Low Energy (BLE)
- Low power design for battery friendly applications
- Various peripherals: GPIO, timers, ADC, UART, SPI, I2C, and more
More information on the board can be found here:
Project Goals 🎯
- Use STM32CubeMX to generate HAL code for gpio communication
- Set up a CMake based project with C++ support in VSCode
- Blink the onboard blue LED every 5 seconds
- Create a flexible, modular structure for future C++ embedded development
Required Tools 🛠️
- STM32CubeMX: Pin configuration and HAL generation
- STM32CubeProgrammer: Flashing the final firmware
- VSCode: Code development and build management
- GNU Arm Embedded Toolchain (
arm-none-eabi-gcc)
Hardware Setup 📟
MCU vs. Board Selector
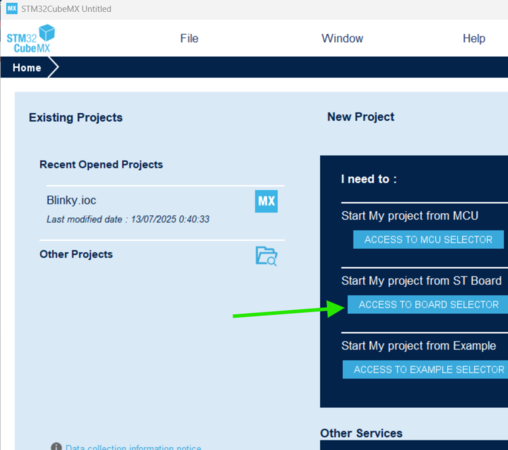
Select Board Selector in STM32CubeMX when targeting ST development boards like the Nucleo-WB55RG. The MCU Selector is typically reserved for custom PCBs or bare STM32 chips.
Once we’ve selected the Nucleo-WB55RG board, we are ready to start our project.
Configuring the Output Pins 🚥
To blink the blue LED, we first need to determine its GPIO pin assignment from the Nucleo-WB55RG schematic.
Selecting the LED Pin
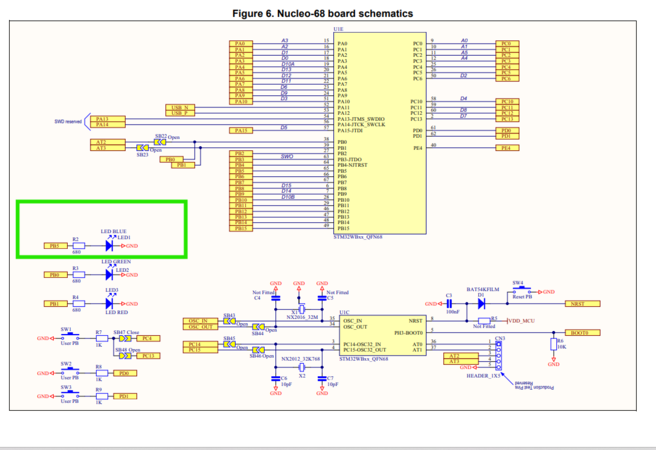
From the schematic, we see that the Blue LED is connected to GPIO Port B, Pin 5 (PB5).
In CubeMX, we can configure this pin as a GPIO Output using the pinout tool. 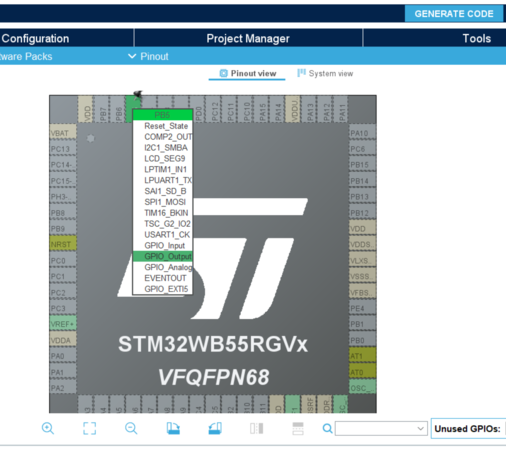
Now that we’ve configured our GPIO output pin for toggling our Blue LED, we can manage our project structure.
Project Manager Configuration
Select the Project Manager tab in CubeMX and:
- Name the project (e.g.,
Blinky) - Choose CMake as the toolchain
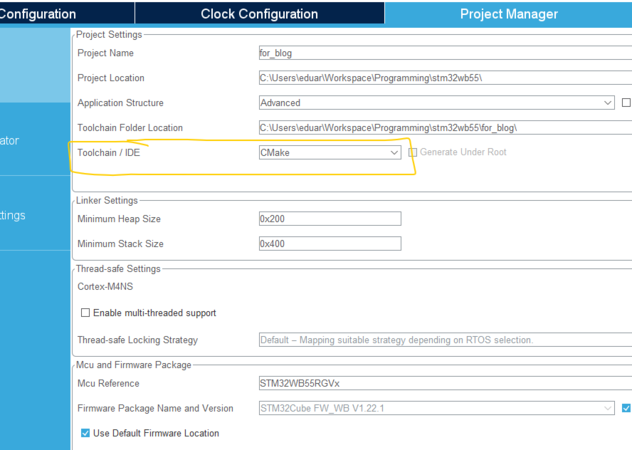
Now that we’ve completed the code setup, we are ready to select Generate Code.
Code Generation: STM32CubeMX Output
CubeMX generates:
- HAL drivers for the configured peripherals in the pintool step
- Startup code and a linker script
- A
CMakeLists.txtandCMakePresets.jsonfor building the final executable
You’ll get a clean project structure like this:
1
2
3
4
5
6
7
8
9
10
$ tree -L 1
.
├── Blinky.ioc
├── CMakeLists.txt
├── CMakePresets.json
├── Core
├── Drivers
├── cmake
├── startup_stm32wb55xx_cm4.s
└── stm32wb55xx_flash_cm4.ld
All generated code is in C, which is fine, it allows for clean separation between CubeMx generated code and our higher level C++ logic.
- Warning: CubeIDE doesn’t work nicely with custom Cmake or C++ structures and tends to overwrite
main.cwhen we import the generated.iocfile from CubeMX. This was another reason I decided to use VSCode, to preserve the generatedmain.c.
A Hybrid Workflow: CubeMx + VSCode
I’ve found that using a hybrid workflow helps in keeping the HAL generated code functionality while maintaining a flexible development environment.
Here’s my hybrid workflow:
Generate the base project using CubeMX with Cmake
Open the project in VSCode, not CubeIDE
Add C++ support in
CMakeLists.txtKeep the CubeMX generated
main.cminimal by redirecting to a C++ entry pointKeep C++ code (
.cpp/.hpp) outside generated foldersRegenerate from CubeMX safely, so HAL updates won’t touch our logic
This lets CubeMX handle low level configuration work, while we manage the application level with C++ abstractins.
Adding C++ Support in CMake 🦾
We must edit the generated CMake file to enable C++17 support. We open the folder of the gnerated code using VSCode and update the CMakeLists.txt:
1
2
3
4
5
6
7
# Enable C++17
set(CMAKE_CXX_STANDARD 17)
set(CMAKE_CXX_STANDARD_REQUIRED ON)

project(${CMAKE_PROJECT_NAME} LANGUAGES C CXX ASM)

enable_language(C CXX ASM)
Now our STM32 project can support C++ files like app.cpp.
Redirecting the Entry Point ▶️
CubeMX will generate a main.c file that looks similar to the code snippet below. Generating initialization functions but allowing for the user to enter their own code in certain sections:
1
2
3
4
5
6
7
8
9
10
11
12
13
14
15
16

int main(void)
{
  HAL_Init();
  SystemClock_Config();
  PeriphCommonClock_Config();
  MX_GPIO_Init(); // Initializes our configured GPIO pin

  /* USER CODE BEGIN */
  while (1)
  {

  }
  /* USER CODE END */

}
Rather than using this while(1) loop directly, we’ll delegate control to a start() function defined in our C++ code. Shifting the entry point from this C function to a C++ function.
So now that we have the basic HAL setup for the GPIO pin we wish to toggle, we can create a higher level driver abstraction for controlling ANY LED pin.
Creating an LED Blinker object in C++ 🚦
Let’s define a small abstraction to control an LED conveniently in C++: LedBlinker.hpp . Here we use the .hpp because this is C++ 😉
1
2
3
4
5
6
7
8
9
10
11
12
13
14
15
16
#pragma once

#include "stm32wbxx_hal.h"

class LedBlinker {
public:
    LedBlinker(GPIO_TypeDef* port_ptr, uint16_t pin_num)
        : port(port_ptr), pin(pin_num) {}

    void on()  { HAL_GPIO_WritePin(port, pin, GPIO_PIN_SET); }
    void off() { HAL_GPIO_WritePin(port, pin, GPIO_PIN_RESET); }

private:
    GPIO_TypeDef* port;
    uint16_t pin;
};
The New App Entry Point
Now with the LedBlinker abstraction setup, we create the application header and implementation file.
The application’s header file declares the new entry point function: start() for the final executable.
1
2
3
4
5
6
7
8
9
10
11
#pragma once

#ifdef __cplusplus
extern "C" {
#endif

void start(void);

#ifdef __cplusplus
}
#endif
and the implementation file uses the LedBlinker abstraction to blink the Blue LED on and off.
1
2
3
4
5
6
7
8
9
10
11
12
13
14
15
16
17
18
19
20
#include "app.hpp"
#include "LedBlinker.hpp"

extern "C" {
#include "main.h"
#include "stm32wbxx_hal.h"
}

void start() {

    LedBlinker led(GPIOB, GPIO_PIN_5); // Blue LED on Nucleo board


    while (1) { // infinite loop
        led.on();
        HAL_Delay(5000); // 5 seconds
        led.off();
        HAL_Delay(5000);
    }
}
Now that we’ve created this new logic for our application we will replace the generated main loop with a call to our application instead.
1
2
3
4
5
6
7
8
9
10
11
12
13
14
15
#include "app.hpp" // include our new application header

int main(void)
{
  HAL_Init();
  SystemClock_Config();
  PeriphCommonClock_Config();
  MX_GPIO_Init();

  /* USER CODE BEGIN */

  start(); // New C++ entry point

  /* USER CODE END*/
}
Be sure to always keep C++ logic outside generated files or inside /* USER CODE */ blocks. This helps keep your code from being touched by the generator.
Update CMake file to Include Our C++ Code
Next we add the new source file to the build system by defining the source file location in our CMakeLists.txt:
1
2
3
4
# Add C++ sources
target_sources(${CMAKE_PROJECT_NAME} PRIVATE
    ${CMAKE_CURRENT_SOURCE_DIR}/Core/app.cpp
)
Building The Application 🔨
Open up the terminal in VSCode and build the project with the following CMake commands:
1
2
3
4
5
6
7
8
9
$ cmake --preset Debug
$ cmake --build build/Debug
...
...
[23/23] Linking CXX executable Blinky.elf
Memory region         Used Size  Region Size  %age Used
           FLASH:       10380 B       512 KB      1.98%
            RAM1:        1584 B     196600 B      0.81%
      RAM_SHARED:          0 GB        10 KB      0.00%
Our final executable is now ready to be flashed on the device!
Flashing the Firmware 🌩️
Use STM32CubeProgrammer to flash the compiled binary. Load the .elf file and download it to the board. Then reset the board with the onboard reset button.

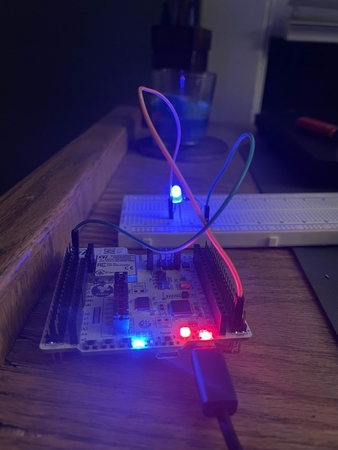
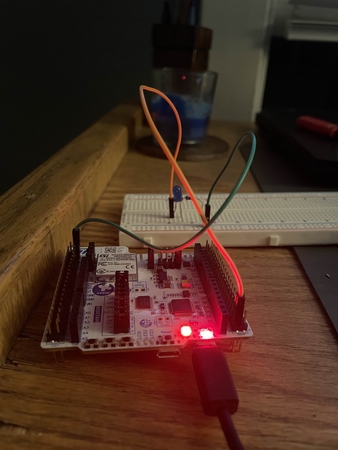
If successful, you should see the blue LED blinking every 5 seconds!
Conclusion 🕵️♂️
This hybrid approach combines the ease of STM32CubeMX peripheral configuration and HAL generation, with the power and modularity of modern C++ and CMake.
Our project setup allows for a clean, maintainable base for future embedded projects:
- building BLE applications,
- sensor-driven systems, or
- working with RTOS in the future.
This post took way longer than I wanted it to take and honestly I’m now thinking that if making a video tutorial would’ve been the better alternative here😄.. hahah
Overall, this was a great learning experience and if I had a bit more patience I’d figure out how to flash onto the device using a command line script instead of using the CubeProgrammer tool 😅.
I’d love to hear how you approach STM32 development. Have you built a similar setup with C++ and CMake? Do you prefer CubeIDE or else like Ozone? Drop your tips, tricks, or even rants below! 👇
Cheers 👌